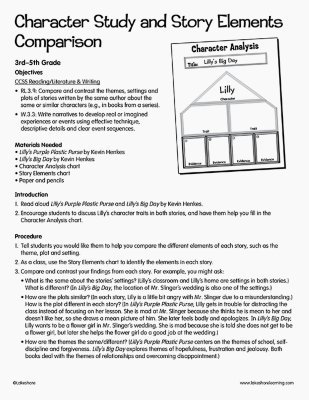
Objectives CCSS Reading/Literature & Writing RL.3.9: Compare and contrast the themes, settings and plots of stories written by the same author about the same or similar characters (e.g., in books from a series). W.3.3: Write narratives to develop real or imagined experiences or events using effective technique, descriptive details and clear event sequences. Materials Needed Lilly’s Purple Plastic Purse by Kevin Henkes Lilly’s Big Day by Kevin Henkes Character Analysis chart Story Elements chart Paper and pencils Introduction Read aloud Lilly’s Purple Plastic Purse and Lilly’s Big Day by Kevin Henkes. Encourage students to discuss Lilly’s character traits in both stories, and have them help you fill in the Character Analysis chart.
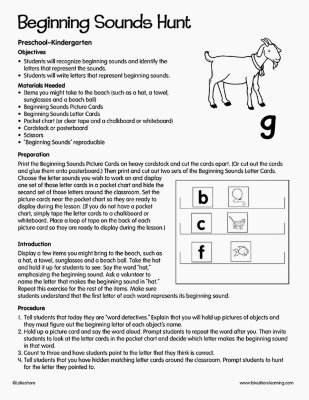
Objectives Students will recognize beginning sounds and identify the letters that represent the sounds. Students will write letters that represent beginning sounds. Materials Needed Items you might take to the beach (such as a hat, a towel, sunglasses and a beach ball) Beginning Sounds Picture Cards Beginning Sounds Letter Cards Pocket chart (or clear tape and a chalkboard or whiteboard) Cardstock or posterboard Scissors “Beginning Sounds” reproducible Preparation: Print the Beginning Sounds Picture Cards on heavy cardstock and cut the cards apart. (Or cut out the cards and glue them onto posterboard.) Then print and cut out two sets of the Beginning Sounds Letter Cards. Choose the letter sounds you wish to work on and display one set of those letter cards in a pocket chart and hide the second set of those letters around the classroom. Set the picture cards near the pocket chart so they are ready to display during the lesson. (If you do not have a pocket chart, simply tape the letter cards to a chalkboard or whiteboard. Place a loop of tape on the back of each picture card so they are ready to display during the lesson.) Introduction Display a few items you might bring to the beach, such as a hat, a towel, sunglasses and a beach ball. Take the hat and hold it up for students to see. Say the word “hat,” emphasizing the beginning sound. Ask a volunteer to name the letter that makes the beginning sound in “hat.” Repeat this exercise for the rest of the items. Make sure students understand that the first letter of each word represents its beginning sound.
Objective Compare and classify objects by observable physical properties. Materials Needed Mickey’s Magnet by Franklyn M. Branley and Eleanor K. Vaughan or What Makes a Magnet? by Franklyn M. Branley Magnets or Magnetic Wands Pipe Stems (cut into 1-or 2-inch pieces) Pom-Poms Variety of small magnetic objects (e.g., paper clips, nuts or bolts, etc.) Variety of small nonmagnetic objects (e.g., rubber bands, plastic counters, feathers, etc.) Clear, empty 2-liter plastic bottles (at least two) Several plastic shoe box–sized containers (one for each small group of students) Sand or dried beans Magnetic/Not Magnetic sorting mat Introduction Read aloud Mickey’s Magnet or What Makes a Magnet?
Objectives Students will listen to or read a story. Students will summarize the story in writing, using sequencing words in their summaries. Materials Needed “Found!” reading passage “First Snow” reading passage “Summarize a Story” reproducible Introduction Provide a copy of the “Found!” reading passage to each student. Display the passage on a projector or chart paper. Read the passage aloud and encourage students to read along with you. Tell students that you are going to demonstrate how to summarize the passage. Explain that you will break it down into three parts, describing what happens at the beginning, middle, and end. As you summarize aloud, underline important parts of the story and have students help you determine which events happen first, next, and last. For example, underline the first three sentences and say, “Robby found a wallet full of money that he could use to buy lots of things he wanted. Can anyone point to the sentence that tells what happens next?” (Answer: Suddenly, Robby saw that the wallet had a driver’s license in it with someone’s name and address.) Underline this sentence and offer a short summary, such as, “Robby found out whom the wallet and money belonged to.” Then ask, “In which sentence can we read about what Robby does at the end of the story?” (Answer: Robby wanted to be a good citizen, so he decided to return the wallet and the money.) Draw a line under the last sentence and say, “Robby decides to return the wallet to its owner.” Go over the three parts again so that the summary is very clear: “First, Robby found a wallet with money in it that he wanted to spend. Next, he found a name and address in the wallet. Last, Robby decides to return the wallet and money to its owner.” Invite students to ask questions about the process as you check for understanding.
Objectives Writing Writing narratives to develop real or imagined experiences or events using effective techniques, descriptive details and clear event sequences Using narrative techniques, such as dialogue, description and pacing, to develop experiences and events or show the responses of characters to situations Using concrete words, phrases and sensory details to convey experiences and events precisely Materials Needed Cloudy with a Chance of Meatballs by Judi Barrett Chart paper or whiteboard Pre-writing graphic organizer Umbrella book reproducible Pencils Crayons or markers Stapler Introduction Read Cloudy with a Chance of Meatballs aloud.